Showing posts with label geometrical. Show all posts

Monday, April 14, 2014

Stylin' Stampin' INKspiration ~ April Card Sketch


It's Monday! We are playing the Card Sketch game over at Stylin' Stampin' INKspiration today. This is a really fun sketch that has a LOT of room for creativity! If you get a chance, pop on over (SSINK) to see what the Design Team girls came up with!


Here is my take:


 Supplies
Cardstock ~ Whisper White, Daffodil Delight, Strawberry Slush Core'dinations, Coastal Cabana Core'dinations
DSP ~ Fresh Prints
Ink ~ Daffodil Delight, Strawberry Slush, Coastal Cabana
Stamp Sets ~ Peachy Keen, Hello Lovely, Geometrical
Tools ~ Paper Trimmer, Paper Snips, Distress Tool, Sanding Block, Dimensionals, Anywhere Glue Stick
Embellishments ~ Rhinestones

Wednesday, February 12, 2014

Wine tags... You're the Best!

I live smack dab in the middle of wine country. Yeah, it's rough. There are so many wonderful wineries out here it's ridiculous. So, I thought I'd make some cute little wine tags. It's so much fun to give a bottle of my favorite to a loved one, but it's even better to be able to personalize it.


I absolutely LOVE this color combination. Summer Starfruit, Midnight Muse and Crumb Cake. How fabulous is that? I love that it's masculine and modern. 


Supplies
Cardstock ~ Midnight Muse, Very Vanilla, Crumb Cake, Summer Starfruit
Ink ~ Crumb Cake, Summer Starfruit, Midnight Muse
Stamp Sets ~ Geometrical, Hello Lovely, Peachy Keen, Gorgeous Grunge, Off the Grid
Tools ~ Paper Trimmer, Paper Snips, Dimensionals, Anywhere Glue Stick, Decorative Label punch, 1" Square punch, Stamp-a-ma-jig, 1 3/4" Circle punch
Embellishments ~ brass brads

Wine tag dimensions: 3" x 7 3/4" (score @ 3")


Wednesday, January 29, 2014

Hello Sweet Sorbet!

Good Morning! The sun is actually shining! I couldn't believe it when I went out to feed my horses. It totally made my day... and that was before 9am! It's gonna be a good one, I can feel it. 

I created this card late last night. I don't know about you, but that's when I work best. After everyone has gone to bed. Of course it helps that I'm an insomniac. I'd much rather play in my craft room than stare at the ceiling. 

I used the sketch from Mojo Monday. It's a fun one with lots of layers (my favorite!). I may have derailed a little along the way, but this was my take on it. I am totally obsessed with this Sweet Sorbet DSP from the Sale-a-Bration catalog. It's FABULOUS! Since I'm a horsey kinda gal, I wanted this card to have a southwestern kind of feel to it. When I saw this DSP in the catalog, I knew that was how I was going to use it. I'm also totally obsessed with the arrows too. So, I wanted to cram as many as I could into this card. It was a perfect way to end a crazy busy day!


Supplies
Cardstock > Coastal Cabana, Whisper White, Summer Starfruit, Pool Party, Pistachio Pudding, Crisp Cantaloupe
DSP > Sweet Sorbet
Ink > Basic Black, Summer Starfruit, Basic Gray, Coastal Cabana
Stamp Sets > Oh Hello, Gorgeous Grunge, Geometrical, Peachy Keen, Hello Lovely
Tools > Stamp-a-ma-jig, paper snips, paper trimmer, Paper Doily Sizzlit, Itty Bitty Shapes Punch pack
Embellishments > Vintage Faceted Designer Buttons

Thursday, January 23, 2014

The Garden Gate ~ Carved with Love

I absolutely LOVE the new "Hardwood" stamp from Stampin' Up! It's so earthy and warm and manly. Perfect for a Valentine's Day card for my hubby! He is the most rugged, manly man I've ever met so a pink cutesy frilly card just wouldn't do it for him. I immediately thought of cutting this stamped image up and adding depth to it by shading the edges with a sponge and adding a darker piece of paper as the base. It worked! Once I did that, I added mini brads to each end to make it look like a gate. I added a few of the new embellishments from the Occasions catalog and a quick sentiment from Teeny Tiny Wishes and it was done! 

I wanted the heart to look like it had been carved with a pocket knife. How sweet is that? So, I pre-stamped the heart in Soft Suede and traced around it with Soft Suede and Early Espresso markers. I used a masking technique to stamp the arrow from the Geometrical stamp set (I'm slightly addicted to those arrows!). 


Supplies
Cardstock ~ Sahara Sand, Soft Suede, Crumb Cake
Ink ~ Crumb Cake, Soft Suede, Early Espresso, Cherry Cobbler
Stamp Sets ~ Hardwood, Hearts a Flutter, Geometrical, Teeny Tiny Wishes
Tools ~ Stampin' paper trimmer, 3/16" Corner punch, Word Window punch, Dimensionals, Paper Piercing tool
Embellishments ~ Mini Brads, Natural 5/8" Chevron Ribbon, Basic Metal Buttons, Linen Thread


Thursday, January 16, 2014

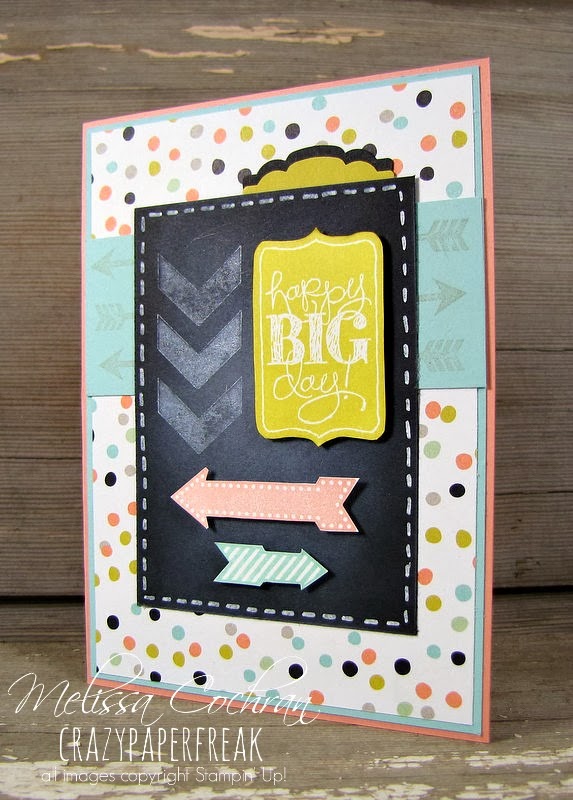
Stylin' Stampin' INKspiration Birthday card! A Sweet Sorbet Birthday

Today at Stylin' Stampin' INKspiration, we're highlighting Birthday cards! So, I decided to do something OUT of my comfort zone. A clean card. No distressing, no aging, no antiquing. Just clean lines. I'm quite surprised that I really like it! I am totally in {love}with the new Sweet Sorbet Designer series paper. It's available in the SALE-A-BRATION catalog from Stampin' Up! This paper just SCREAMED Happy Birthday to me. I'm also completely obsessed with the new stamp sets that are available in the Occasions catalog. Especially all of the amazing arrows! 

Take a quick minute and stop by Stylin' Stampin' INKspiration to check out some amazing Birthday cards!


{inside}

Supplies
Cardstock ~ Crisp Cantaloupe, Pool Party, Summer Starfruit, Basic Black, Whisper White
Designer Series Paper ~ Sweet Sorbet
Ink/Markers ~ Sahara Sand, Pool Party, Crisp Cantaloupe, Basic Black, Summer Starfruit, Chalk marker, Whisper White Craft ink
Stamp Sets ~ Peachy Keen, Geometrical, Hello Lovely, Chalk Talk
Tools ~ Chalk Talk Framelits, Artisan Label Punch, Stampin' Up! paper snips, Dimensionals, Sponge daubers


1. Using the Artisan Label punch, punch out two shapes and glue them together 

2. Cut out your pieces
Crisp Cantaloupe ~ 5 1/2 x 8 (makes a 4 x 5 1/2" card)
Pool Party ~ 3 7/8 x 5 5/8"
Sweet Sorbet DSP ~ 3 3/4" x 5 1/4"
Pool Party (strip) ~ 1 1/2" x 3 7/8"
Basic Black ~ 2 3/4" x 3 3/4"

3. Chalkboard effect ~ Using Whisper White craft ink and a sponge dauber, lightly swirl ink onto the cardstock. Smudge until smooth. Draw dotted line around the outside with the new Chalk marker.

4. Stamp arrows from Geometrical stamp set in Sahara Sand in opposite directions.

5. Stamp arrows from Peechy Keen and Hello Lovely in Crisp Cantaloupe and Pool Party and cut out with paper snips.

6. Stamp the "Happy Big Day" form the Chalk Talk stamp set in Summer Starfruit and cut out with paper snips. 

7. Using the Chevron stamp from the Geometrical stamp set, stamp with Whisper White craft ink onto the chalkboard. I used my Stamp-a-ma-jig to line them up perfectly. 

8. Assemble your card. Use Dimensionals underneath the "Happy Big Day" piece and the two arrows. You can just glue them on if you'd like, but this adds a little depth to the card. 

{Inside}

1. Cut Summer Starfruit cardstock to 3 7/8 x 5 5/8"
2. Cut Whisper White cardstock to 3 3/4" x 5 1/4"
3. Lightly stamp arrows from the Geometrical stamp set around the outside of the Whisper White piece.
4. Stamp "Hooray for Today" from the Geometrical stamp set in Basic Black. 
5. Stand back and smile, you did a fabulous job!

I hope you've found this helpful. I've noticed that I get so wrapped up in the project that I forget to take photos along the way. Let me know if you have any questions and I will gladly help you out. Thanks for stopping by!


Wednesday, January 8, 2014

Ahoy! #148: A Nautical Birthday Wish

I have been obsessed with nautical themes lately. I don't know where it's coming from. I am always short on masculine cards so maybe that's the reason? One look at the new Fresh Prints Designer Paper Series and I KNEW this card had to be nautical. How does one NOT love this stuff? I really like the size of the new pack. It's perfect for cards. So I set to work. What do you think about when you think "nautical"? I think ocean, ships, lots of studs and metal rigging. Here is what I came up with. I hope you like it! I've used the sketch from Mojo Monday's challenge #327.


{Inside}


Supplies
Cardstock ~ Midnight Muse, Early Espresso, Crumb Cake, Cherry Cobbler
Designer Paper Series ~ Fresh Prints
Ink ~ Early Espresso, Soft Suede, Baked Brown Sugar, Real Red, Craft White
*clear embossing powder over the "Make a Wish" stamp
Stamp Sets ~ Woodgrain, Perfect Pennants, The Open Sea, Perfectly Penned (inside), Geometrical (inside), Gorgeous Grunge (inside)
Embellishments ~ 1/8" mini brads
Other supples ~ Shaker Frames, Window Sheet, Dimensionals

How to:
Stamp "Woodgrain" onto Crumb Cake cardstock using Early Espresso ink.

Cut into strips measuring 3/4" x 3 3/4" and round the corners.

Distress, crumple, mash, and sponge with Baked Brown Sugar ink.

Cut Fresh Prints DSP to a 1 3/4 strip. You'll have to double the length as it wasn't quite wide enough to cover. Distress, crumple, and sponge with Early Espresso, and Baked Brown Sugar ink.

Time to make the compass! I used the compass stamp from The Open Sea, the 1" circle punch and the 1 3/8" circle punch, Shaker Frame, and Window sheet. Assemble the compass with a small piece of Dimensional. There you go!

I hope you've found this helpful. I'm sure I missed a step or two. I constantly become so engrossed in the project that I forget to take pictures as I go. I'll have to work on that!

01 09 10